Packages Tutorial

Packages Tutorial

Welcome to this tutorial. I will do my best to give you a basic introduction into custom development of zammad.

Until there is a marketplace and/or a developer/packages documentation officially available by Zammad GmbH, this might help you to get some insights about how to handle packages in zammad. I will try to show you some basics and tips and tricks to keep your development compatible and easy to maintain.

Be aware that all my small tutorials are using my GIT aliases. So if you want to rebuild my tutorial packages, you should keep a look there before you start. Also, all tutorials listed below are based on a zammad 6.x. and might not age well, because of the fast update cycle of zammad and the WIP new tech stack.

This thread might extend over time when we have questions about specific topics.

All my topics are very custom development specific. If you want to learn about zammad in general, you should learn HTML, Rails, CoffeeScript, JS and read our developer manual:

https://github.com/zammad/zammad/blob/develop/doc/developer_manual/index.md

7 Likes

Basics

Zammad contains the functionality to install and remove packages. You can find the package manager in the admin interface:

Admin → Packages

To install a package, you will need a package build:

A *.zpm

ZPM stands for Zammad Package Module. It can be selected and installed. Afterwards in the top there will be list of commands which the normal administrator wants to execute.

root> zammad config:set BUNDLE_DEPLOYMENT=0
root> zammad run bundle config set --local deployment 'false'

These commands will allow package installations to handle custom gem files. In zammad it is also possible to inject your own gem files to include own libraries for your custom development.
To introduce your own gem files, you need to create them with the following naming: Gemfile.local.ExampleTestPackage. All Gemfile.local* will be included into the bundle install.

root> zammad run bundle install

If your package contains a local gem file, then the 3 upper commands will be shown in the admin interface. This command is needed to install gems of zammad and also of your custom developments.

root> zammad run rake zammad:package:migrate

This command will run all specific package migrations. They are handled over a non-rails zammad specific code, which will save executed package migrations and run them only once per install and once per removal of the package.

root> zammad run rake assets:precompile

This command will compile all assets for zammad. You want to run this command always if you have installed a new package with frontend files like *.js, *.coffee, *.jst.eco or *.css.

root> zammad run rake zammad:package:post_install

With never systems you will only see this command left. It is a coombination of the previous commands and will run the commands which are needed. It simplifies package installations and also provides the foundation for the new tech stack which includes new commands. Since this tutorial is focused on the old tech stack, we will leave it with that for now (zammad/lib/tasks/zammad/package/post_install.rb at c81e7ad5a99b76bc76175731c710e298092db218 · zammad/zammad · GitHub).

root> systemctl restart zammad

This commands obviously restarts zammad. Changes of your ruby files will get activated after the restart.

2 Likes

About SZPM and ZPM

There are 2 types of package files:

szpm

The source zammad package module (szpm) contains the locations and meta information of your zammad custom development. It will be used to build the package.

zpm

The zammad package module (zpm) is the compressed version of your source file and contains all data of your customized files as based64 encoded strings in a json file.


To build it, you will need a *.szpm with your modified or new files:

example_package.szpm

{
  "name": "Example-Package",
  "version": "1.0.0",
  "vendor": "Example GmbH",
  "license": "GNU AFFERO GENERAL PUBLIC LICENSE",
  "url": "http://example.com/",
  "files": [
    {
      "location": "public/assets/test.txt",
      "permission": 644
    }
  ]
}

public/assets/test.txt

Hello World

The result of the compressed zpm file will look like this:

example_package-1.0.0.zpm

{
  "name": "Example-Package",
  "version": "1.0.0",
  "vendor": "Example GmbH",
  "license": "GNU AFFERO GENERAL PUBLIC LICENSE",
  "url": "http://example.com/",
  "files": [
    {
      "location": "public/assets/test.txt",
      "permission": 644,
      "encode": "base64",
      "content": "SGVsbG8gV29ybGQK"
    }
  ]
}

You should name your package like Vendor-Feature and be aware that also the downcased file naming is also important for migration handling and the package installation.

2 Likes

Requirements (Aliases, Scripts)

Currently, the commands for the package development are not included into zammad. So you will have to find your own way how to build the package. In this tutorial, we will set up a package with some custom commands.

As I already mentioned, there is no toolchain yet in zammad to build your packages.
So we will have some small helper scripts and git aliases which will make our life easy (My home directory is /home/ubuntu-rs):

Note: Make sure that your package directory always has this format: Vendor-FeatureTestBla (vendor + dash + feature name all in camelcase).

Aliases

To setup the GIT Aliases which are needed for the tutorial, check out the setup instructions in my repository:

You should also set this ENV variable in your ~/.bashrc:

export DEVELOPMENT_FILE_WATCHER="file_update_checker"

It will improve the detection of modified files in rails and make your custom development easier in development mode.

Note: All these helper scripts are very bad and simple and might update and extend over time. We will grow them with future tutorials and make them more stable for this tutorial. I just made them barely work, so we have a starting point to learn. I just moved them to GitHub. We will improve them over time with new tutorials and make them better. Feel free to help.

2 Likes

Hello World Package

  1. Create a new package directory:
ubuntu-rs@ubuntu-rs:/workspace/git_zammad$ mkdir Example-HelloWorld
ubuntu-rs@ubuntu-rs:/workspace/git_zammad$ cd Example-HelloWorld/
  1. Init your github repository:
ubuntu-rs@ubuntu-rs:/workspace/git_zammad/Example-HelloWorld$ git init
  1. Setup a szpm dummy source file:
ubuntu-rs@ubuntu-rs:/workspace/git_zammad/Example-HelloWorld$ git zammad-new-szpm
ubuntu-rs@ubuntu-rs:/workspace/git_zammad/Example-HelloWorld$ cat example-hello_world.szpm
{
  "name": "Example-HelloWorld",
  "version": "1.0.0",
  "vendor": "Example GmbH",
  "license": "GNU AFFERO GENERAL PUBLIC LICENSE",
  "url": "http://example.com/",
  "files": []
}
  1. Now we need some kind of change. In this case we will just make a public text file visible on our zammad server:
ubuntu-rs@ubuntu-rs:/workspace/git_zammad/Example-HelloWorld$ mkdir -p public/assets/
ubuntu-rs@ubuntu-rs:/workspace/git_zammad/Example-HelloWorld$ echo "Hello World" > public/assets/hello.txt
  1. To update the file list of our szpm file, we can use our alias. It will update the file list for our szpm file:
ubuntu-rs@ubuntu-rs:/workspace/git_zammad/Example-HelloWorld$ git zammad-update-szpm
ubuntu-rs@ubuntu-rs:/workspace/git_zammad/Example-HelloWorld$ cat example-hello_world.szpm
{
  "name": "Example-HelloWorld",
  "version": "1.0.0",
  "vendor": "Example GmbH",
  "license": "GNU AFFERO GENERAL PUBLIC LICENSE",
  "url": "http://example.com/",
  "files": [
    {
      "location": "public/assets/hello.txt",
      "permission": 644
    }
  ]
}
  1. Now we want create our first release. The alias will take the szpm file and render all listed files as based64 encoded files into our first release 1.0.0:
ubuntu-rs@ubuntu-rs:/workspace/git_zammad/Example-HelloWorld$ git zammad-create-zpm 1.0.0
ubuntu-rs@ubuntu-rs:/workspace/git_zammad/Example-HelloWorld$ cat example-hello_world-1.0.0.zpm
{
  "name": "Example-HelloWorld",
  "version": "1.0.0",
  "vendor": "Example GmbH",
  "license": "GNU AFFERO GENERAL PUBLIC LICENSE",
  "url": "http://example.com/",
  "files": [
    {
      "location": "public/assets/hello.txt",
      "permission": 644,
      "encode": "base64",
      "content": "SGVsbG8gV29ybGQK"
    }
  ]
}

As you can see, the data of the file needs to be base64 encoded. Be aware that my test scripts are very basic and only to simplify the explanation here. However, we can
use this file to update our zammad and get our file deployed.

  1. Take your final example-hello_world-1.0.0.zpm and install it in your zammad (Admin → Packages).

systemctl restart zammad Should always run after the installation of a package

  1. Your file is now available in your zammad e.g:

https://rolf.zammad.com/assets/hello.txt

2 Likes

Package migrations

Database migrations in the package can be done in a seperate addon specific folder. In this tutorial we will create a very simple migration which will update a setting of zammad.

  1. Create a new package directory:
ubuntu-rs@ubuntu-rs:/workspace/git_zammad$ mkdir Example-Setting
ubuntu-rs@ubuntu-rs:/workspace/git_zammad$ cd Example-Setting
  1. Init your github repository:
ubuntu-rs@ubuntu-rs:/workspace/git_zammad/Example-Setting$ git init
  1. Setup a szpm dummy source file:
ubuntu-rs@ubuntu-rs:/workspace/git_zammad/Example-Setting$ git zammad-new-szpm
ubuntu-rs@ubuntu-rs:/workspace/git_zammad/Example-Setting$ cat example-setting.szpm
{
  "name": "Example-Setting",
  "version": "1.0.0",
  "vendor": "Example GmbH",
  "license": "GNU AFFERO GENERAL PUBLIC LICENSE",
  "url": "http://example.com/",
  "files": []
}
  1. Now we need to add our migration. We will change the product name of our zammad instance. For this we need to create an migration:

db/addon/example_setting/20230825000000_create_base.rb

class CreateBase < ActiveRecord::Migration[4.2]
  def self.up
    Setting.set('product_name', 'Example Setting')
  end

  def self.down; end
end

self.up Runs on package installation
self.down Runs on package removal

So on installation of the package this file will update the Setting Product Name. You can find all settings here:
https://github.com/zammad/zammad/blob/1a1a092ceedf93b12ca865b715292f00bea2d76b/db/seeds/settings.rb

Setting.get is used to get the state of the setting.
Setting.set is used to change the state of the setting.
Setting stores the configuration of the setting.

(https://github.com/zammad/zammad/blob/1a1a092ceedf93b12ca865b715292f00bea2d76b/app/models/setting.rb)

  1. To update the file list of our szpm file, we can use our alias. It will update the file list for our szpm file:
ubuntu-rs@ubuntu-rs:/workspace/git_zammad/Example-Setting$ git zammad-update-szpm
ubuntu-rs@ubuntu-rs:/workspace/git_zammad/Example-Setting$ cat example-setting.szpm
{
  "name": "Example-Setting",
  "version": "1.0.0",
  "vendor": "Example GmbH",
  "license": "GNU AFFERO GENERAL PUBLIC LICENSE",
  "url": "http://example.com/",
  "files": [
    {
      "location": "db/addon/example_setting/20230825000000_create_base.rb",
      "permission": 644
    }
  ]
}
  1. Now we can build a release for our setting changing package:
ubuntu-rs@ubuntu-rs:/workspace/git_zammad/Example-Setting$ git zammad-create-zpm 1.0.0
ubuntu-rs@ubuntu-rs:/workspace/git_zammad/Example-Setting$ cat example-setting-1.0.0.zpm
{
  "name": "Example-Setting",
  "version": "1.0.0",
  "vendor": "Example GmbH",
  "license": "GNU AFFERO GENERAL PUBLIC LICENSE",
  "url": "http://example.com/",
  "files": [
    {
      "location": "db/addon/example_setting/20230825000000_create_base.rb",
      "permission": 644,
      "encode": "base64",
      "content": "Y2xhc3MgQ3JlYXRlQmFzZSA8IEFjdGl2ZVJlY29yZDo6TWlncmF0aW9uWzQu\nMl0KICBkZWYgc2VsZi51cAogICAgU2V0dGluZy5zZXQoJ3Byb2R1Y3RfbmFt\nZScsICdFeGFtcGxlIFNldHRpbmcnKQogIGVuZAoKICBkZWYgc2VsZi5kb3du\nOyBlbmQKZW5kCg=="
    }
  ]
}
  1. Take your example-setting-1.0.0.zpm build and install it into your zammad. Afterwards, you will need to run the following commands:
zammad> rake zammad:package:migrate
root> systemctl restart zammad

rake zammad:package:migrate to run the migrations of your package
systemctl restart zammad Should always run after the installation of a package

  1. Check your settings in the admin interface (Admin → Branding). Your product name should have changed to:

Example Setting

2 Likes

Package linking

Yeah, that’s the question of how to deal with all that stuff. Personally, I normally have multiple ways how I deal with packages.
Because I deal with zammad on daily bases, I slam a lot of code and directly prepare the structure in my external package folder. After I created all base files I need for my development, I will link them into my source installation of zammad an continue development from there:

For example if we have the database migration package from the last tutorial, you can simply do this:

ubuntu-rs@ubuntu-rs:/workspace/git_zammad/zammad$ git zammad-link Example-Setting
Loading development environment (Rails 6.1.7.6)
[1] pry(main)> Package.link(%q!/workspace/git_zammad/Example-Setting!)
Create dir: /workspace/git_zammad/zammad/db/addon
Create dir: /workspace/git_zammad/zammad/db/addon/example_setting
Link file: /workspace/git_zammad/Example-Setting/db/addon/example_setting/20230825000000_create_base.rb -> /workspace/git_zammad/zammad/db/addon/example_setting/20230825000000_create_base.rb
Link file: /workspace/git_zammad/Example-Setting/example-setting.szpm -> /workspace/git_zammad/zammad/example-setting.szpm
=> nil

This will link all files into your zammad directory, and you can continue your development there.

This is also the reason why we set the ENV DEVELOPMENT_FILE_WATCHER in the requirements. It will make sure that we detect changes of our custom development better in development mode, and the rails server will catch more changes.

Be aware that there are directories which will force you to a server restart any ways. For example, if you want to monkey patch something in the config/initializers, then you will always need to restart your application.

Sometimes it also makes sense to prepare the code in the zammad codebase. E.g. when I work on a proof of concept for something.
Then you want to have a way to copy your zammad files into a package folder:

ubuntu-rs@ubuntu-rs:/workspace/git_zammad/zammad$ git cf /workspace/git_zammad/Example-Setting/ app/models/ticket.rb

This command will copy the ticket.rb file from your zammad into your package folder and create the parent directories as well.

2 Likes

Monkey patching (coffee, rails)

Monkey patching is a big deal when it comes to compatibility and if you are a real hacker man then you want your add-on to run as smooth as possible on your target system.

The zammad codebase is changing very frequently, so it can easily happen that your changes get outdated and your package is the one which is making your zammad system to hell.

Patching rails

Imagine patching the ticket.rb:

https://github.com/zammad/zammad/blob/23a841fff42c2f3dfbbce467ec691e9068baf4a4/app/models/ticket.rb

IT HAS 1500 LINES CODE. FUCK. If you want to patch this file in your package then it might only take one stable update and your package ruins the system, because your package ticket.rb will of course win and the changes of your core will not get considered anymore.

In our example we might want to patch this function:

  def current_state_color
    return '#f35912' if escalation_at && escalation_at < Time.zone.now

    case state.state_type.name
    when 'new', 'open'
      return '#faab00'
    when 'closed'
      return '#38ad69'
    when 'pending reminder'
      return '#faab00' if pending_time && pending_time < Time.zone.now
    end

    '#000000'
  end

(https://github.com/zammad/zammad/blob/23a841fff42c2f3dfbbce467ec691e9068baf4a4/app/models/ticket.rb#L994-L1007)

To patch this, you could patch the hole file (which is bad) or you monkey patch like this:

config/initializers/example_ticket_patch.rb

ActiveSupport::Reloader.to_prepare do
  Ticket.class_eval do
    alias_method :current_state_color_original, :current_state_color

    def current_state_color
      result = current_state_color_original
      if result == '#000000'
        result = '#FFFFFF'
      end
      result
    end
  end
end

This example is the second-best case you can have. It is an appended monkey patch. This means the the original function is not even touched and your change only happens after the original function is run. Then you change something at the result based on the result of the original function and return your overwritten value.

The best case is of course if don’t patch any of the core files and work with the rails standard. E.g. events etc. There is a lot of stuff you can do in rails without event touching the zammad code base.

Patching coffee

Same stuff for the frontend. Checkout this file:

https://github.com/zammad/zammad/blob/23a841fff42c2f3dfbbce467ec691e9068baf4a4/app/assets/javascripts/app/lib/app_post/utils.coffee

1500 LINES of code as well. But you can also easy monkey patch it with appending a new file which is executed after the original file. E.g.:

  @icon: (name, className = '') ->
    return if !name

    # rtl support
    # ===========
    #
    # translates @Icon('arrow-{start}') to @Icon('arrow-left') on ltr and @Icon('arrow-right') on rtl
    dictionary =
      ltr:
        start: 'left'
        end: 'right'
      rtl:
        start: 'right'
        end: 'left'
    if name.indexOf('{') > 0 # only run through the dictionary when there is a {helper}
      for key, value of dictionary[App.i18n.dir()]
        name = name.replace("{#{key}}", value)

This function will return an icon. E.g. the zammad logo which is used at various places.

app/assets/javascripts/app/lib/app_post/utils_example_patch.coffee

class App.UtilsExamplePatch extends App.Utils
  @icon: (name, className = '') ->
    return if !name
    return '<img src="/assets/images/logo.svg" width="42" height="36">' if name is 'logo'
    return super

App.Utils = App.UtilsExamplePatch

CoffeeScript is old, but most of our old codebase is great for monkey patching at the moment. So in this example I do a prepending monkey patch which is returning a different value if the icon for the logo is asked. In all other cases, I do return the original value.

Important for the monkey patching here is also the execution order of the files, which is alphabetic. So make sure your file is handled after the original one.

2 Likes

Manage Cities (Admin Interface Package)

In this tutorial I will show you how you can create a full admin interface for a model with a few steps. In our scenario we love cities and we want an admin interface where we can handle our cities via API in zammad.

  1. Create a new package directory:
ubuntu-rs@ubuntu-rs:/workspace/git_zammad$ mkdir Example-AdminCity
ubuntu-rs@ubuntu-rs:/workspace/git_zammad$ cd Example-AdminCity
  1. Init your github repository:
ubuntu-rs@ubuntu-rs:/workspace/git_zammad/Example-AdminCity$ git init
  1. Setup a szpm dummy source file:
ubuntu-rs@ubuntu-rs:/workspace/git_zammad/Example-AdminCity$ git zammad-new-szpm
ubuntu-rs@ubuntu-rs:/workspace/git_zammad/Example-AdminCity$ cat example-admin_city.szpm
{
  "name": "Example-AdminCity",
  "version": "1.0.0",
  "vendor": "Example GmbH",
  "license": "GNU AFFERO GENERAL PUBLIC LICENSE",
  "url": "http://example.com/",
  "files": []
}
  1. To store our city names we need a database migration. It will create a new table cities with a name column, add a permission which is used to access the data and also add some translations for the case, that you are (in this example) german speaking.

db/addon/example_admin_city/20230825000000_create_base.rb

class CreateBase < ActiveRecord::Migration[4.2]
  def self.up
    create_table :cities do |t|
      t.column :name, :string, limit: 255,  null: false
      t.references :created_by, null: false, foreign_key: { to_table: :users }
      t.references :updated_by, null: false, foreign_key: { to_table: :users }
      t.timestamps null: false, limit: 3
    end

    Permission.create_if_not_exists(
      name:        'admin.city',
      note:        __('Manage %s'),
      preferences: {
        translations: [__('Cities')]
      },
    )

    {
      'City'          => 'Stadt',
      'Cities'        => 'Städte',
      'I like cities' => 'Ich mag Städte',
      'New City'      => 'Neue Stadt',
    }.each do |key, value|
      Translation.create_if_not_exists(
        locale:         'de-de',
        source:         key,
        target:         value,
        target_initial: value,
        updated_by_id:  1,
        created_by_id:  1,
      )
    end
  end

  def self.down
    Permission.find_by(name: 'admin.city').destroy
    drop_table :cities
  end
end
  1. To access the data via rails we need a model:

app/model/city.rb

class City < ApplicationModel; end
  1. To access the data via the API we need a controller and a policy which restricts the access to the admin permission. We have generic controller functions which make it easy to a generate API’s like this.

app/controllers/cities_controller.rb

class CitiesController < ApplicationController
  prepend_before_action :authenticate_and_authorize!

  def index
    model_index_render(City, params)
  end

  def show
    model_show_render(City, params)
  end

  def create
    model_create_render(City, params)
  end

  def update
    model_update_render(City, params)
  end

  def destroy
    model_destroy_render(City, params)
  end
end

app/policies/controllers/cities_controller_policy.rb

class Controllers::CitiesControllerPolicy < Controllers::ApplicationControllerPolicy
  default_permit!('admin.city')
end
  1. To make our controller accessible in the frontend we need also some routes:

config/routes/city.rb

Zammad::Application.routes.draw do
  api_path = Rails.configuration.api_path

  match api_path + '/cities',            to: 'cities#index',   via: :get
  match api_path + '/cities/:id',        to: 'cities#show',    via: :get
  match api_path + '/cities',            to: 'cities#create',  via: :post
  match api_path + '/cities/:id',        to: 'cities#update',  via: :put
  match api_path + '/cities/:id',        to: 'cities#destroy', via: :delete
end
  1. Now our backend is working but we also want to have a frontend to administration. This model will
    grant us access and store our data in the frontend to handle it.

app/assets/javascripts/app/models/city.coffee

class App.City extends App.Model
  @configure 'City', 'name'
  @extend Spine.Model.Ajax
  @url: @apiPath + '/cities'
  @configure_attributes = [
    { name: 'name', display: __('Name'), tag: 'input', type: 'text', limit: 100,  null: false },
  ]
  @configure_delete = true
  @configure_clone = true
  @configure_overview = [
    'name',
  ]

  @description = __('I like cities')

This controller will use the frontend model and generate a generic admin interface for it:

app/assets/javascripts/app/controllers/city.coffee

class City extends App.ControllerSubContent
  @requiredPermission: 'admin.city'
  header: __('Cities')

  constructor: ->
    super

    @genericController = new App.ControllerGenericIndex(
      el: @el
      id: @id
      genericObject: 'City'
      defaultSortBy: 'name'
      pageData:
        home: 'cities'
        object: __('City')
        objects: __('Cities')
        pagerAjax: true
        pagerBaseUrl: '#manage/cities/'
        pagerSelected: ( @page || 1 )
        pagerPerPage: 150
        navupdate: '#cities'
        notes: [
          __('I like cities')
        ]
        buttons: [
          { name: __('New City'), 'data-type': 'new', class: 'btn--success' }
        ]
      container: @el.closest('.content')
    )

  show: (params) =>
    for key, value of params
      if key isnt 'el' && key isnt 'shown' && key isnt 'match'
        @[key] = value

    @genericController.paginate( @page || 1 )

App.Config.set('City', { prio: 3300, name: __('City'), parent: '#manage', target: '#manage/cities', controller: City, permission: ['admin.city'] }, 'NavBarAdmin')
  1. Now we can update our file list and get ready for the build:
ubuntu-rs@ubuntu-rs:/workspace/git_zammad/Example-AdminCity$ git zammad-update-szpm
ubuntu-rs@ubuntu-rs:/workspace/git_zammad/Example-AdminCity$ cat example-admin_city.szpm
{
  "name": "Example-AdminCity",
  "version": "1.0.0",
  "vendor": "Example GmbH",
  "license": "GNU AFFERO GENERAL PUBLIC LICENSE",
  "url": "http://example.com/",
  "files": [
    {
      "location": "app/assets/javascripts/app/controllers/city.coffee",
      "permission": 644
    },
    {
      "location": "app/assets/javascripts/app/models/city.coffee",
      "permission": 644
    },
    {
      "location": "app/controllers/cities_controller.rb",
      "permission": 644
    },
    {
      "location": "app/model/city.rb",
      "permission": 644
    },
    {
      "location": "app/policies/controllers/cities_controller_policy.rb",
      "permission": 644
    },
    {
      "location": "config/routes/city.rb",
      "permission": 644
    },
    {
      "location": "db/addon/example_admin_city/20230825000000_create_base.rb",
      "permission": 644
    }
  ]
}
  1. And build it:
ubuntu-rs@ubuntu-rs:/workspace/git_zammad/Example-AdminCity$ git zammad-create-zpm 1.0.0
ubuntu-rs@ubuntu-rs:/workspace/git_zammad/Example-AdminCity$ cat example-admin_city-1.0.0.zpm
{
  "name": "Example-AdminCity",
  "version": "1.0.0",
  "vendor": "Example GmbH",
  "license": "GNU AFFERO GENERAL PUBLIC LICENSE",
  "url": "http://example.com/",
  "files": [
    {
      "location": "app/assets/javascripts/app/controllers/city.coffee",
      "permission": 644,
      "encode": "base64",
      "content": "Y2xhc3MgQ2l0eSBleHRlbmRzIEFwcC5Db250cm9sbGVyU3ViQ29udGVudAog\nIEByZXF1aXJlZFBlcm1pc3Npb246ICdhZG1pbi5jaXR5JwogIGhlYWRlcjog\nX18oJ0NpdGllcycpCgogIGNvbnN0cnVjdG9yOiAtPgogICAgc3VwZXIKCiAg\nICBAZ2VuZXJpY0NvbnRyb2xsZXIgPSBuZXcgQXBwLkNvbnRyb2xsZXJHZW5l\ncmljSW5kZXgoCiAgICAgIGVsOiBAZWwKICAgICAgaWQ6IEBpZAogICAgICBn\nZW5lcmljT2JqZWN0OiAnQ2l0eScKICAgICAgZGVmYXVsdFNvcnRCeTogJ25h\nbWUnCiAgICAgIHBhZ2VEYXRhOgogICAgICAgIGhvbWU6ICdjaXRpZXMnCiAg\nICAgICAgb2JqZWN0OiBfXygnQ2l0eScpCiAgICAgICAgb2JqZWN0czogX18o\nJ0NpdGllcycpCiAgICAgICAgcGFnZXJBamF4OiB0cnVlCiAgICAgICAgcGFn\nZXJCYXNlVXJsOiAnI21hbmFnZS9jaXRpZXMvJwogICAgICAgIHBhZ2VyU2Vs\nZWN0ZWQ6ICggQHBhZ2UgfHwgMSApCiAgICAgICAgcGFnZXJQZXJQYWdlOiAx\nNTAKICAgICAgICBuYXZ1cGRhdGU6ICcjY2l0aWVzJwogICAgICAgIG5vdGVz\nOiBbCiAgICAgICAgICBfXygnSSBsaWtlIGNpdGllcycpCiAgICAgICAgXQog\nICAgICAgIGJ1dHRvbnM6IFsKICAgICAgICAgIHsgbmFtZTogX18oJ05ldyBD\naXR5JyksICdkYXRhLXR5cGUnOiAnbmV3JywgY2xhc3M6ICdidG4tLXN1Y2Nl\nc3MnIH0KICAgICAgICBdCiAgICAgIGNvbnRhaW5lcjogQGVsLmNsb3Nlc3Qo\nJy5jb250ZW50JykKICAgICkKCiAgc2hvdzogKHBhcmFtcykgPT4KICAgIGZv\nciBrZXksIHZhbHVlIG9mIHBhcmFtcwogICAgICBpZiBrZXkgaXNudCAnZWwn\nICYmIGtleSBpc250ICdzaG93bicgJiYga2V5IGlzbnQgJ21hdGNoJwogICAg\nICAgIEBba2V5XSA9IHZhbHVlCgogICAgQGdlbmVyaWNDb250cm9sbGVyLnBh\nZ2luYXRlKCBAcGFnZSB8fCAxICkKCkFwcC5Db25maWcuc2V0KCdDaXR5Jywg\neyBwcmlvOiAzMzAwLCBuYW1lOiBfXygnQ2l0eScpLCBwYXJlbnQ6ICcjbWFu\nYWdlJywgdGFyZ2V0OiAnI21hbmFnZS9jaXRpZXMnLCBjb250cm9sbGVyOiBD\naXR5LCBwZXJtaXNzaW9uOiBbJ2FkbWluLmNpdHknXSB9LCAnTmF2QmFyQWRt\naW4nKQo="
    },
    {
      "location": "app/assets/javascripts/app/models/city.coffee",
      "permission": 644,
      "encode": "base64",
      "content": "Y2xhc3MgQXBwLkNpdHkgZXh0ZW5kcyBBcHAuTW9kZWwKICBAY29uZmlndXJl\nICdDaXR5JywgJ25hbWUnCiAgQGV4dGVuZCBTcGluZS5Nb2RlbC5BamF4CiAg\nQHVybDogQGFwaVBhdGggKyAnL2NpdGllcycKICBAY29uZmlndXJlX2F0dHJp\nYnV0ZXMgPSBbCiAgICB7IG5hbWU6ICduYW1lJywgZGlzcGxheTogX18oJ05h\nbWUnKSwgdGFnOiAnaW5wdXQnLCB0eXBlOiAndGV4dCcsIGxpbWl0OiAxMDAs\nICBudWxsOiBmYWxzZSB9LAogIF0KICBAY29uZmlndXJlX2RlbGV0ZSA9IHRy\ndWUKICBAY29uZmlndXJlX2Nsb25lID0gdHJ1ZQogIEBjb25maWd1cmVfb3Zl\ncnZpZXcgPSBbCiAgICAnbmFtZScsCiAgXQoKICBAZGVzY3JpcHRpb24gPSBf\nXygnSSBsaWtlIGNpdGllcycpCg=="
    },
    {
      "location": "app/controllers/cities_controller.rb",
      "permission": 644,
      "encode": "base64",
      "content": "Y2xhc3MgQ2l0aWVzQ29udHJvbGxlciA8IEFwcGxpY2F0aW9uQ29udHJvbGxl\ncgogIHByZXBlbmRfYmVmb3JlX2FjdGlvbiA6YXV0aGVudGljYXRlX2FuZF9h\ndXRob3JpemUhCgogIGRlZiBpbmRleAogICAgbW9kZWxfaW5kZXhfcmVuZGVy\nKENpdHksIHBhcmFtcykKICBlbmQKCiAgZGVmIHNob3cKICAgIG1vZGVsX3No\nb3dfcmVuZGVyKENpdHksIHBhcmFtcykKICBlbmQKCiAgZGVmIGNyZWF0ZQog\nICAgbW9kZWxfY3JlYXRlX3JlbmRlcihDaXR5LCBwYXJhbXMpCiAgZW5kCgog\nIGRlZiB1cGRhdGUKICAgIG1vZGVsX3VwZGF0ZV9yZW5kZXIoQ2l0eSwgcGFy\nYW1zKQogIGVuZAoKICBkZWYgZGVzdHJveQogICAgbW9kZWxfZGVzdHJveV9y\nZW5kZXIoQ2l0eSwgcGFyYW1zKQogIGVuZAplbmQK"
    },
    {
      "location": "app/model/city.rb",
      "permission": 644,
      "encode": "base64",
      "content": "Y2xhc3MgQ2l0eSA8IEFwcGxpY2F0aW9uTW9kZWw7IGVuZAo="
    },
    {
      "location": "app/policies/controllers/cities_controller_policy.rb",
      "permission": 644,
      "encode": "base64",
      "content": "Y2xhc3MgQ29udHJvbGxlcnM6OkNpdGllc0NvbnRyb2xsZXJQb2xpY3kgPCBD\nb250cm9sbGVyczo6QXBwbGljYXRpb25Db250cm9sbGVyUG9saWN5CiAgZGVm\nYXVsdF9wZXJtaXQhKCdhZG1pbi5jaXR5JykKZW5kCg=="
    },
    {
      "location": "config/routes/city.rb",
      "permission": 644,
      "encode": "base64",
      "content": "WmFtbWFkOjpBcHBsaWNhdGlvbi5yb3V0ZXMuZHJhdyBkbwogIGFwaV9wYXRo\nID0gUmFpbHMuY29uZmlndXJhdGlvbi5hcGlfcGF0aAoKICBtYXRjaCBhcGlf\ncGF0aCArICcvY2l0aWVzJywgICAgICAgICAgICB0bzogJ2NpdGllcyNpbmRl\neCcsICAgdmlhOiA6Z2V0CiAgbWF0Y2ggYXBpX3BhdGggKyAnL2NpdGllcy86\naWQnLCAgICAgICAgdG86ICdjaXRpZXMjc2hvdycsICAgIHZpYTogOmdldAog\nIG1hdGNoIGFwaV9wYXRoICsgJy9jaXRpZXMnLCAgICAgICAgICAgIHRvOiAn\nY2l0aWVzI2NyZWF0ZScsICB2aWE6IDpwb3N0CiAgbWF0Y2ggYXBpX3BhdGgg\nKyAnL2NpdGllcy86aWQnLCAgICAgICAgdG86ICdjaXRpZXMjdXBkYXRlJywg\nIHZpYTogOnB1dAogIG1hdGNoIGFwaV9wYXRoICsgJy9jaXRpZXMvOmlkJywg\nICAgICAgIHRvOiAnY2l0aWVzI2Rlc3Ryb3knLCB2aWE6IDpkZWxldGUKZW5k\nCg=="
    },
    {
      "location": "db/addon/example_admin_city/20230825000000_create_base.rb",
      "permission": 644,
      "encode": "base64",
      "content": "Y2xhc3MgQ3JlYXRlQmFzZSA8IEFjdGl2ZVJlY29yZDo6TWlncmF0aW9uWzQu\nMl0KICBkZWYgc2VsZi51cAogICAgY3JlYXRlX3RhYmxlIDpjaXRpZXMgZG8g\nfHR8CiAgICAgIHQuY29sdW1uIDpuYW1lLCA6c3RyaW5nLCBsaW1pdDogMjAw\nLCAgbnVsbDogZmFsc2UKICAgICAgdC5yZWZlcmVuY2VzIDpjcmVhdGVkX2J5\nLCBudWxsOiBmYWxzZSwgZm9yZWlnbl9rZXk6IHsgdG9fdGFibGU6IDp1c2Vy\ncyB9CiAgICAgIHQucmVmZXJlbmNlcyA6dXBkYXRlZF9ieSwgbnVsbDogZmFs\nc2UsIGZvcmVpZ25fa2V5OiB7IHRvX3RhYmxlOiA6dXNlcnMgfQogICAgICB0\nLnRpbWVzdGFtcHMgbnVsbDogZmFsc2UsIGxpbWl0OiAzCiAgICBlbmQKCiAg\nICBQZXJtaXNzaW9uLmNyZWF0ZV9pZl9ub3RfZXhpc3RzKAogICAgICBuYW1l\nOiAgICAgICAgJ2FkbWluLmNpdHknLAogICAgICBub3RlOiAgICAgICAgX18o\nJ01hbmFnZSAlcycpLAogICAgICBwcmVmZXJlbmNlczogewogICAgICAgIHRy\nYW5zbGF0aW9uczogW19fKCdDaXRpZXMnKV0KICAgICAgfSwKICAgICkKCiAg\nICB7CiAgICAgICdDaXR5JyAgICAgICAgICA9PiAnU3RhZHQnLAogICAgICAn\nQ2l0aWVzJyAgICAgICAgPT4gJ1N0w6RkdGUnLAogICAgICAnSSBsaWtlIGNp\ndGllcycgPT4gJ0ljaCBtYWcgU3TDpGR0ZScsCiAgICAgICdOZXcgQ2l0eScg\nPT4gJ05ldWUgU3RhZHQnLAogICAgfS5lYWNoIGRvIHxrZXksIHZhbHVlfAog\nICAgICBUcmFuc2xhdGlvbi5jcmVhdGVfaWZfbm90X2V4aXN0cygKICAgICAg\nICBsb2NhbGU6ICAgICAgICAgJ2RlLWRlJywKICAgICAgICBzb3VyY2U6ICAg\nICAgICAga2V5LAogICAgICAgIHRhcmdldDogICAgICAgICB2YWx1ZSwKICAg\nICAgICB0YXJnZXRfaW5pdGlhbDogdmFsdWUsCiAgICAgICAgdXBkYXRlZF9i\neV9pZDogIDEsCiAgICAgICAgY3JlYXRlZF9ieV9pZDogIDEsCiAgICAgICkK\nICAgIGVuZAogIGVuZAoKICBkZWYgc2VsZi5kb3duCiAgICBQZXJtaXNzaW9u\nLmZpbmRfYnkobmFtZTogJ2FkbWluLmNpdHknKS5kZXN0cm95CiAgICBkcm9w\nX3RhYmxlIDpjaXRpZXMKICBlbmQKZW5kCg=="
    }
  ]
}
  1. To install the package example-admin_city-1.0.0.zpm we need to install it via Admin → Package and afterwards run the following commands:
zammad> rake zammad:package:migrate
zammad> rake assets:precompile
root> systemctl restart zammad
  1. Here we go:

2 Likes

Telnyx SMS Notification (SMS Integration Package)

Many people here asked, how to do an SMS integration. Today we will build one. I actually put in the effort and tried to implement a new provider just for you guys. First step is to find a provider you want to implement. I found out that we have a couple of US people and Telnyx is one of the most popular services. So why not!

  1. Let’s understand how to send an SMS via Telnyx:
require "telnyx"

Telnyx.api_key = "YOUR_API_KEY"

from_number = "YOUR_TELNYX_NUMBER"
to_number = "DESTINATION_NUMBER"

response = Telnyx::Message.create(
    from: from_number,
    to: to_number,
    text: "Hello, world!"
)

(Send a Message on the Telnyx Platform | Telnyx)

This looks actually very simple. We already have a gem which is ready to use, and it is just a couple of lines to send SMS. WOW, nice!

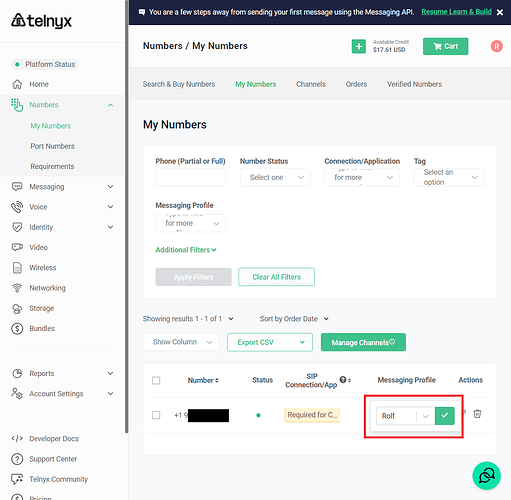
  1. Now you have to register an account. For the number you need also to configure a message profile to define the sender name of your new number.

  1. Before we start with the package, we should do a proof of concept. Normally I just create an poc.rb for testing:
ubuntu-rs@ubuntu-rs:/workspace/git_zammad/zammad$ gem install telnyx
Successfully installed telnyx-2.9.0
Parsing documentation for telnyx-2.9.0
Installing ri documentation for telnyx-2.9.0
Done installing documentation for telnyx after 0 seconds
1 gem installed

poc.rb

Telnyx.api_key = 'KEY018xxxx'
Telnyx::Message.create(
  from: '+1912xxx',
  to:   '+491xxxx',
  text: SecureRandom.uuid,
)

Now the big problem came in. I am german and this service does not allow you to send SMS internationally. This is the end… :face_exhaling: I already bought a number for this tutorial and wasted a couple of bucks, so there is no return. I went to the account settings and asked for Level 2 access. With that you are allowed to send SMS as well internationally.

After a couple of days they agreed. We are BACK! :star_struck:

  1. Finally, it works. Now we have to understand how it works in Zammad. I’m a big fan of copy paste so let’s just go with the massenversand integration:

It’s like ~70 lines of code. Very simple! There is an send function which sends the SMS and we have the definition function which holds the configuration for the UI.

Let me rework this for telnyx:

app/models/channel/driver/sms/telnyx.rb

class Channel::Driver::Sms::Telnyx
  NAME = 'sms/telnyx'.freeze

  # Style/OptionalBooleanParameter
  def send(options, attr, _notification = false) # rubocop:disable Style/OptionalBooleanParameter
    Rails.logger.info "Sending SMS to recipient #{attr[:recipient]}"

    return true if Setting.get('import_mode')

    Rails.logger.info "Backend sending Telnyx SMS to #{attr[:recipient]}"
    begin
      send_create(options, attr)

      true
    rescue => e
      message = __('Error while performing request to Telnyx')
      Rails.logger.error message
      Rails.logger.error e
      raise message
    end
  end

  def send_create(options, attr)
    require 'telnyx'

    Telnyx.api_key = options[:token]
    Telnyx::Message.create(
      from: options[:sender],
      to:   attr[:recipient],
      text: attr[:message],
    )
  end

  def self.definition
    {
      name:         'Telnyx',
      adapter:      'sms/telnyx',
      notification: [
        { name: 'options::token', display: __('API Token'), tag: 'input', type: 'text', limit: 200, null: false, placeholder: 'YOUR_API_KEY' },
        { name: 'options::sender', display: __('Sender'), tag: 'input', type: 'text', limit: 200, null: false, placeholder: '+18665552368' },
      ]
    }
  end
end
  1. For the gem support we also need a Gemfile:

Gemfile.local.ExampleTelnyx

gem 'telnyx'
  1. Let’s package up:
ubuntu-rs@ubuntu-rs:/workspace/git_zammad/Example-Telnyx$ git zammad-new-szpm
ubuntu-rs@ubuntu-rs:/workspace/git_zammad/Example-Telnyx$ git zammad-update-szpm
ubuntu-rs@ubuntu-rs:/workspace/git_zammad/Example-Telnyx$ git zammad-create-zpm 1.0.0
ubuntu-rs@ubuntu-rs:/workspace/git_zammad/Example-Telnyx$ cat example-telnyx-1.0.0.zpm
{
  "name": "Example-Telnyx",
  "version": "1.0.0",
  "vendor": "Example GmbH",
  "license": "GNU AFFERO GENERAL PUBLIC LICENSE",
  "url": "http://example.com/",
  "files": [
    {
      "location": "Gemfile.local.ExampleTelnyx",
      "permission": 644,
      "encode": "base64",
      "content": "Z2VtICd0ZWxueXgnCg=="
    },
    {
      "location": "app/models/channel/driver/sms/telnyx.rb",
      "permission": 644,
      "encode": "base64",
      "content": "IyBDb3B5cmlnaHQgKEMpIDIwMTItMjAyMyBaYW1tYWQgRm91bmRhdGlvbiwg\naHR0cHM6Ly96YW1tYWQtZm91bmRhdGlvbi5vcmcvCgpjbGFzcyBDaGFubmVs\nOjpEcml2ZXI6OlNtczo6VGVsbnl4CiAgTkFNRSA9ICdzbXMvdGVsbnl4Jy5m\ncmVlemUKCiAgIyBTdHlsZS9PcHRpb25hbEJvb2xlYW5QYXJhbWV0ZXIKICBk\nZWYgc2VuZChvcHRpb25zLCBhdHRyLCBfbm90aWZpY2F0aW9uID0gZmFsc2Up\nICMgcnVib2NvcDpkaXNhYmxlIFN0eWxlL09wdGlvbmFsQm9vbGVhblBhcmFt\nZXRlcgogICAgUmFpbHMubG9nZ2VyLmluZm8gIlNlbmRpbmcgU01TIHRvIHJl\nY2lwaWVudCAje2F0dHJbOnJlY2lwaWVudF19IgoKICAgIHJldHVybiB0cnVl\nIGlmIFNldHRpbmcuZ2V0KCdpbXBvcnRfbW9kZScpCgogICAgUmFpbHMubG9n\nZ2VyLmluZm8gIkJhY2tlbmQgc2VuZGluZyBUZWxueXggU01TIHRvICN7YXR0\ncls6cmVjaXBpZW50XX0iCiAgICBiZWdpbgogICAgICBzZW5kX2NyZWF0ZShv\ncHRpb25zLCBhdHRyKQoKICAgICAgdHJ1ZQogICAgcmVzY3VlID0+IGUKICAg\nICAgbWVzc2FnZSA9IF9fKCdFcnJvciB3aGlsZSBwZXJmb3JtaW5nIHJlcXVl\nc3QgdG8gVGVsbnl4JykKICAgICAgUmFpbHMubG9nZ2VyLmVycm9yIG1lc3Nh\nZ2UKICAgICAgUmFpbHMubG9nZ2VyLmVycm9yIGUKICAgICAgcmFpc2UgbWVz\nc2FnZQogICAgZW5kCiAgZW5kCgogIGRlZiBzZW5kX2NyZWF0ZShvcHRpb25z\nLCBhdHRyKQogICAgcmVxdWlyZSAndGVsbnl4JwoKICAgIFRlbG55eC5hcGlf\na2V5ID0gb3B0aW9uc1s6dG9rZW5dCiAgICBUZWxueXg6Ok1lc3NhZ2UuY3Jl\nYXRlKAogICAgICBmcm9tOiBvcHRpb25zWzpzZW5kZXJdLAogICAgICB0bzog\nICBhdHRyWzpyZWNpcGllbnRdLAogICAgICB0ZXh0OiBhdHRyWzptZXNzYWdl\nXSwKICAgICkKICBlbmQKCiAgZGVmIHNlbGYuZGVmaW5pdGlvbgogICAgewog\nICAgICBuYW1lOiAgICAgICAgICdUZWxueXgnLAogICAgICBhZGFwdGVyOiAg\nICAgICdzbXMvdGVsbnl4JywKICAgICAgbm90aWZpY2F0aW9uOiBbCiAgICAg\nICAgeyBuYW1lOiAnb3B0aW9uczo6dG9rZW4nLCBkaXNwbGF5OiBfXygnQVBJ\nIFRva2VuJyksIHRhZzogJ2lucHV0JywgdHlwZTogJ3RleHQnLCBsaW1pdDog\nMjAwLCBudWxsOiBmYWxzZSwgcGxhY2Vob2xkZXI6ICdZT1VSX0FQSV9LRVkn\nIH0sCiAgICAgICAgeyBuYW1lOiAnb3B0aW9uczo6c2VuZGVyJywgZGlzcGxh\neTogX18oJ1NlbmRlcicpLCB0YWc6ICdpbnB1dCcsIHR5cGU6ICd0ZXh0Jywg\nbGltaXQ6IDIwMCwgbnVsbDogZmFsc2UsIHBsYWNlaG9sZGVyOiAnKzE4NjY1\nNTUyMzY4JyB9LAogICAgICBdCiAgICB9CiAgZW5kCmVuZAo="
    }
  ]
}
  1. Install the package on your testsystem (Admin → Packages) and run the commands:
root> zammad config:set BUNDLE_DEPLOYMENT=0
root> zammad run bundle config set --local deployment 'false'
root> zammad run bundle install
root> systemctl restart zammad
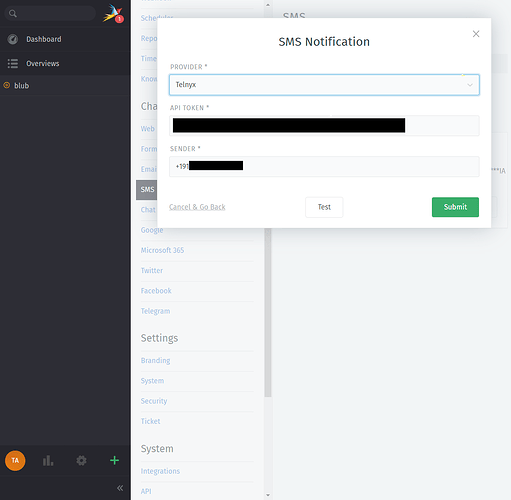
  1. After installation, we need to configure the integration:

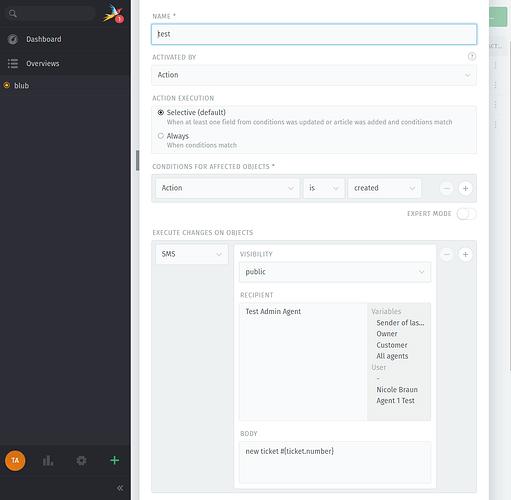
  1. Now we need to fill the Mobile phone number of our admin and add this trigger for ticket create:

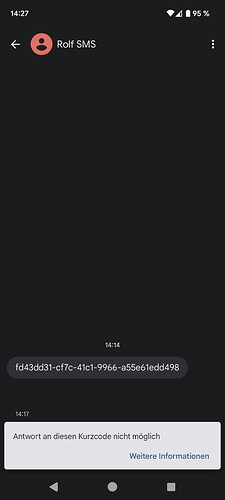
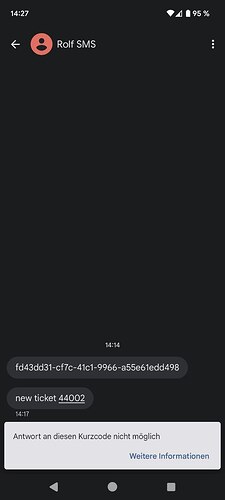
  1. It’s SMS time! Let’s create a ticket and watch our phone:

Full repository

If you want to check out the full code, check my repository:

3 Likes